- How To Install the Astra Theme
- System Requirement for Astra Theme
- What Is a Child Theme and How To Install It for Astra?
- Manually Install Astra via FTP
- How to Update Astra Theme Manually?
- Automatic Beta Updates for Astra
- Astra 4.2.0-beta.1 : Migrations & Backwards Compatibility
- Know More about Astra Beta Versions? How to Download and Use?
- How to Create a Multisite Network and Use Astra Child Theme On It
- Getting Started with Astra Pro Addon Plugin
- What is Astra Pro Add on?
- How to Install Astra Pro Plugin?
- How to Get License Key of Astra Pro?
- How to Activate Astra Pro Addon License?
- Getting error – The package could not be installed. The theme is missing the style.css stylesheet?
- Why Can’t I Access Astra Pro Features After Purchasing the Pro Version?
- Do Not See License Activation Form for Astra Pro Addon Plugin?
- How to Fix “Sorry, You Are Not Allowed To Access This Page” Error In Astra Pro
- How to Manage License on Store?
- How to Renew Yearly License?
- How Do License Upgrades Work?
- How To Update Your Payment Method?
- How to Process Refund Requests?
- How to Apply For Brainstorm Force Affiliate Program? (Become Astra Affiliate)
- Frequently Asked Questions – VIP Priority Support
- How do I check my Support Ticket History?
- How To Create a Header With Astra Header Builder
- How To Create Mobile Header With Astra Header Builder
- How To Create a Footer With Astra Footer Builder
- Why Is My Logo Blurry?
- Astra – Customize the Submenu
- FAQs – Astra Header/Footer Builder
- Elements in Header/Footer Builder With Astra Theme and Astra Pro
- Add Multiple Elements in Header Footer Builder
- FAQs – Astra Header/Footer Builder – Existing Customers
- How To Manage Sidebars in Free Astra Theme
- Understanding Sidebar Style in Astra Theme: Customizing Your Sidebar’s Look
- Sticky Sidebar
- Scroll To Top
- How to Display a Breadcrumb Anywhere within a Page or Post with Shortcode?
- Find the Way With Breadcrumbs
- How to Change the “HOME” String in Breadcrumbs
- How to Switch From Existing Breadcrumb to New Trail?
- How To Add Breadcrumbs in WordPress Website with Astra
- Astra WooCommerce Mini Cart Shortcode
- WooCommerce Module Overview
- How to Design a Product Catalog Page or Shop Page Using WooCommerce Module in Astra?
- Single Product WooCommerce
- Checkout Page WooCommerce
- Colors & Background Options For WooCommerce
- Typography Options for WooCommerce
- Off-Canvas Sidebar for WooCommerce Shop Page
- Quick View for WooCommerce Products
- How to Disable EDD Inbuilt Styling?
- How to Add Download Archive Pages to the Menu When Using Astra with EDD?
- How to Add EDD Cart in Header? (Old Astra Header)
- How to Display a Mini Cart Anywhere Using Shortcode? (Astra and EDD)
- EDD – Easy Digital Downloads Module Overview
- General – EDD Module Options
- Product Archive – EDD Module Options
- Single Product – EDD Module Options
- Checkout Page – EDD Module Options
- Footer Custom Text Helper Strings
- Does Astra support Beaver Themer Plugin?
- How To Disable Right Click in WordPress
- Increasing the PHP Memory Limit of Your Website
- How To Disable Header or Footer for a Landing Page or Post
- Where Does Astra Primary Color Setting Take Effect?
- How To Adjust the Width of Your Sidebar
- How to Update the Plugin Manually from WordPress Backend?
- Recommended Settings for Elementor and the Astra Theme
- How To Translate Site Builder With WPML?
- How To Make Astra Multilingual With WPML
- How to Translate Astra Strings with WPML?
- Translating the Advanced Custom Fields with WPML
- How to Turn Astra Website Multilingual with Polylang?
- How to Translate Categories, Tags, and Astra Strings with Polylang
- How to Turn Astra Website Multilingual with TranslatePress?
- How to Translate Astra Theme / Plugins in Your Own Language using GlotPress?
- Translate Site Builder Layouts Using Polylang
- How to translate the WooCommerce string?
- How to Change “Add to Cart” button text?
- How Translations can be Manually Exported and Uploaded to the Site?
- Astra theme String Translation for WooCommerce
- Astra Widget Translation with Polylang
- How to Use POEdit to Translate Astra Theme and Astra Pro Plugin
- Fix for – The PCLZIP_ERR_BAD_FORMAT (-10) Error
- Host Google Fonts Locally – Performance Is the Key
- Fix for – Parse error: syntax error, unexpected T_FUNCTION
- How to fix Fatal Error / White Screen of Death?
- Fix for- cURL error 51: SSL: no alternative certificate subject name matches target host name ‘websitedemos.net’
- ‘The preview could not be loaded’ Pop Up with Astra and Elementor
- Troubleshooting Steps ( with Health Check & Troubleshooting plugin )
- How to Deal with Update Issues in Astra Theme and Astra Pro Addon?
- Blog Featured Image Size Not Working / Error in Image Processing Library
- How to Change the Default Astra Strings
- Using Hooks in Astra
- How to Change the “Scroll To Top” Icon in Astra?
- Astra Pro WP CLI Commands
- How to Add Custom PHP Code?
- How to Disable the Loading of Astra’s Default Font File? (Astra.woff)
- Disable Featured Image on Posts, Pages, or Other Post Types
- Change Sidebar Widget Title Heading Tag
- Disable All Meta Settings of Page or Post by Default
- How to Change Website Logo Destination URL
- Remove Primary Navigation Menu with Hook
- Change the Astra Header Breakpoint Width
- How to Disable Primary Header?
- Add Title attribute to Header Background Image as a Substitute for Alt Text
- How to Change HTML tag for Site Title and Tagline?
- How to Change the Heading Tag for the Page/Post Titles?
- How to Change the “Search Results For” String
- Change Placeholder for Search Box (Old Astra Header)
- How to Change Previous and Next Link Text from a Single Blog Post?
- How to Remove Featured Image Link on Archive Page?
- Filter to Remove Link From Featured Images on Blog Page
- Blog Featured Image Size Not Working / Error in Image Processing Library
- Filters to Support CPTs for Blog Meta and Single Blog Meta
- How To Change Navigation Links Text for a Blog Archive?
- How to Display the Post Category as a Related Posts Title?
- Change “Leave A Comment” title tag
- Customizing Social Profile Links for Individual Authors in Single Posts
- Change Woocommerce Out of Stock Text
- How to Disable Product Quantity (Plus-Minus) Buttons?
- How to Modify/Change the Quick View text?
- Filter to Add Global Button Settings Support for WooCommerce Buttons
- Change the “Shopping Cart” Text for WooCommerce & EDD Mobile Header Cart
- Fix Woocommerce Cart Becoming Transparent With Header Builder
- Restrict Search Results to WooCommerce Products Only
- How To Hide Quantity Number When the Woocommerce Cart Is Empty?
- Remove Astra Customization for WooCommerce
- How to Add Custom CSS Code Without Editing Theme Files?
- How to Highlight a Certain Menu Item?
- How to Design Bullets & Lists?
- Dim Content on Menu Hover
- How to add custom CSS and JavaScript to Astra theme
- How To add Custom CSS for Specific Pages
- Mobile Breakpoint Causes Issues with Transparent Header Menu Color
- How to Create Custom CSS using Inspect Element Tool?
- Display Coupon Field on Checkout & Cart Pages
- Fix Swap Sections Not Working on Mobile (Old Astra Header)
- How to Remove Google Fonts Suggestions in Astra Theme?
- Remove default stretched block layout spacing
- How to Change the Logo on Specific Pages?
- How to remove horizontal & vertical gallery layouts from a single product page?
- Introducing New Filter to Enable/Disable Rank-Math Theme Support
- Enable/Disable YouTube videos from Astra admin dashboard
- How to Fix the Line Height Unit being converted to “EM”?
- How to Change WordPress Post labels to Projects
How To Make Astra Multilingual With WPML
The Astra theme is 100% translation-ready and compatible with WPML. This document will help you create a multilingual website with the WPML plugin.
Since it’s a premium plugin, please make sure you’ve purchased WPML before proceeding.
How To Setup WPML
For translating your Astra-based website with WPML, you will need several plugins.
Install and Activate plugins
Let’s see how you can download and install these plugins:
Step 1 – Login to your WPML account and download the following plugins from the “Download WPML manually” section:
- WPML Multilingual CMS
- String Translation

- Media Translation

Step 2 – Login to your website backend and navigate to Plugins > Add New > Upload Plugin. Choose the plugin .zip file and click the “Install Now” button to install a plugin. Install all mentioned plugins this way.
Step 3 – Activate all installed WPML plugins.
Step 4 – When you activate the “WPML Multilingual CMS” plugin, you will see a notification in your Dashboard to start configuring WPML.
You can click the “Configure WPML” button on the notice or navigate to WPML > Setup. This will activate the Setup wizard.

Setup Wizard
The setup wizard will guide you through the whole multilanguage setup process and preparing your website for translation:
Step 1 – The first wizard option, “Languages”, is where you will add the languages you need. Choose your “Default language”. This is your primary language for your existing website content.
Next, you need to add all other languages you wish to translate your website to by clicking on the “+” icon. If you can’t find your language in the dropdown list, you can create a custom language.
For our example, we will use English (default), German and French languages:

Once you have added all languages, click “Continue”.
Step 2 – In the next step, “URL Format”, you need to decide what will your URLs for different languages look like – different directories, different domains, or with added parameters.

Step 3 – On the third step (“Register WPML”) you need to add your “Site key”. You can find this by clicking on “Get a key for this site”. You will be transferred to the “Sites” page on the WPML website.

Also, you do this manually by going to your WPML account. Log in, navigate to “My Account”, and click on “Register WPML on your sites” (Account > Sites).
On the “Sites” page, click on the “Add new site” button. You will be asked to add your website URL and confirm if this is a development or production website.
Once you click on “Finish”, you will see a code. Copy this code to the wizard field on your website. Click “Continue” to move to the next step.
Step 4 – In the fourth step, you need to provide context about your website, such as what it’s about and who it’s for. This information will later help WPML create better automatic translations.

Next, decide how WPML should translate popular English names, like “Email”.

Step 5 – While AI translation is the recommended method for translating your website, WPML also lets you translate by yourself or with other users.

If you’re creating a website for a client, you can also set a “Translation Manager” to choose the options and assign the translators.
Step 6 – “Support” is the step where you can opt-in to share your theme and plugin information with WPML to get faster support and compatibility alerts. For our example, we decided not to share this information.

Step 7 – If you’re running third-party plugins like WooCommerce or WPForms, the next step (“Plugins”) will recommend WPML components (if any). If you need these to be multilingual too, we recommend you add these components.

To install and activate these components (plugins), mark them in the list and click “Install and Activate”. Otherwise, click on “Skip” to move to the last step.
Step 8 – For the last step, “Finish”, WPML will add a language switcher to the bottom of your footer. You can edit or disable this one, and enable other language switchers by navigating to WPML > Languages.

The WPML plugin is now set, and additional languages were added to your website. Now you need to translate your content, media, and options.
Media Translation Setup
Once you finish your WPML setup, you will see the notification to finish the Media Translation Setup. You can do this by clicking on the link in the notification or by navigating to WMPL > Media Translation.

Once you navigate to this page, click on the “Finish setup” button. This will load all of your website media and automatically copy the media name from the original language.
That’s it – your media translations are set.
In addition, if you wish to edit translations for your media at any time, you can click on the translation (pencil) icon for any media files in the list. Here, you will see the following settings:
- Translate the file name
- Use a different file – This can be used if you have a logo or images with translatable text
These additional settings are not obligatory, and you do them at any time for any media file.
Translating Pages, Posts, and Post Types in Astra
When you translate pages or posts with WPML, you get linked versions of pages or posts where each version is assigned a language.
We will show you how to create the translated version of your page in just a couple of steps:
Step 1 – Navigate to WPML → Translation Dashboard and expand the sections with the content you want to translate. Select your items and scroll down to Step 2.

Step 2 -Choose the languages you want to translate into and select a translation method.
To get the best translations, we recommend translating automatically using WPML’s most accurate AI translator – Private Translation Cloud (PTC).
PTC is like your own team of expert translators with a deep understanding of your content and niche. It’s WPML’s proprietary AI technology, and even includes a translation quality guarantee: If you’re not satisfied with PTC’s translations, you’ll get a full refund.
When ready to begin, click the Translate button to start translating.

Reviewing Translations
Since PTC can create translations that are far better than professional human translators, you can skip the review process if you like.
If at any point you want to edit translations, just go to WPML → Translations and open the page you translated.

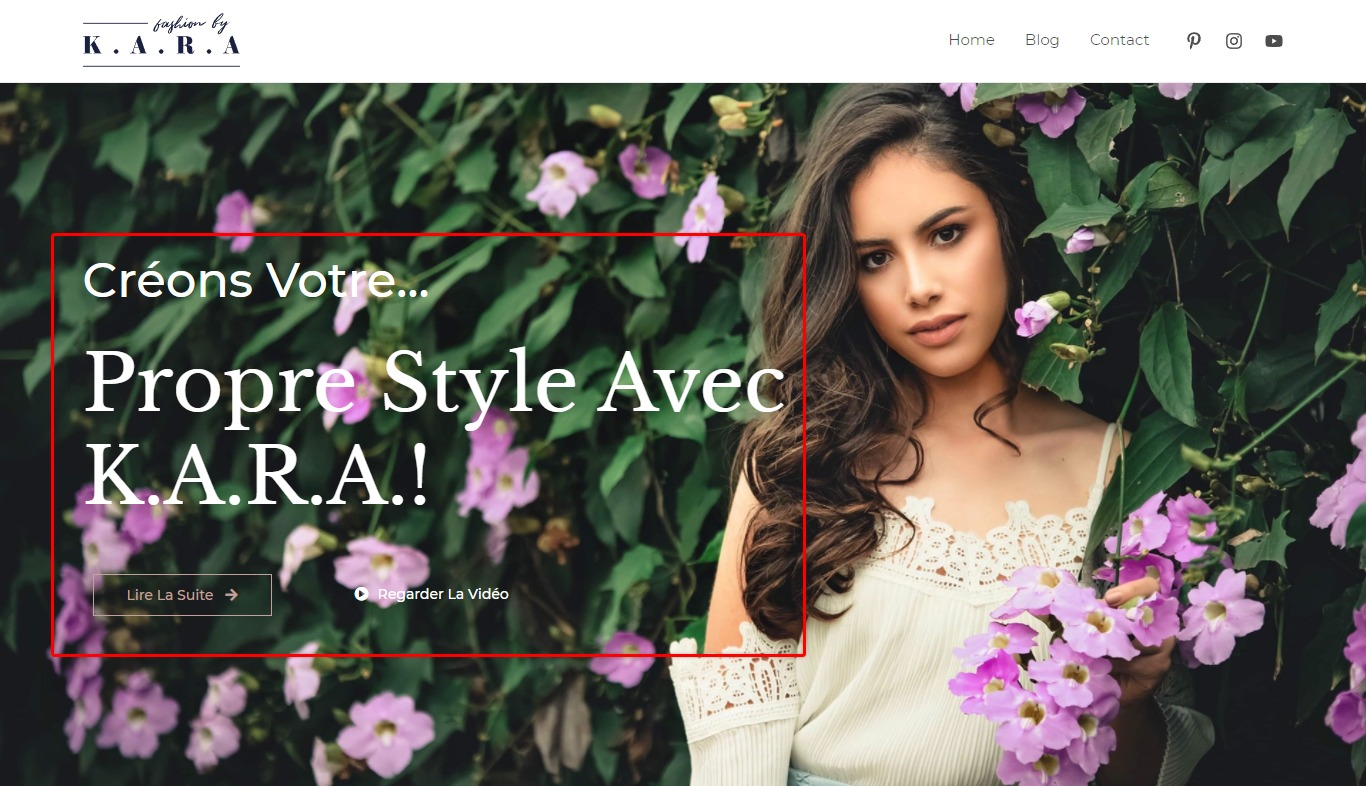
This will open a front-end editor which shows you what translations will look like on your website. If at any moment you’re unsatisfied with the quality, just click the Edit translations button to make changes.
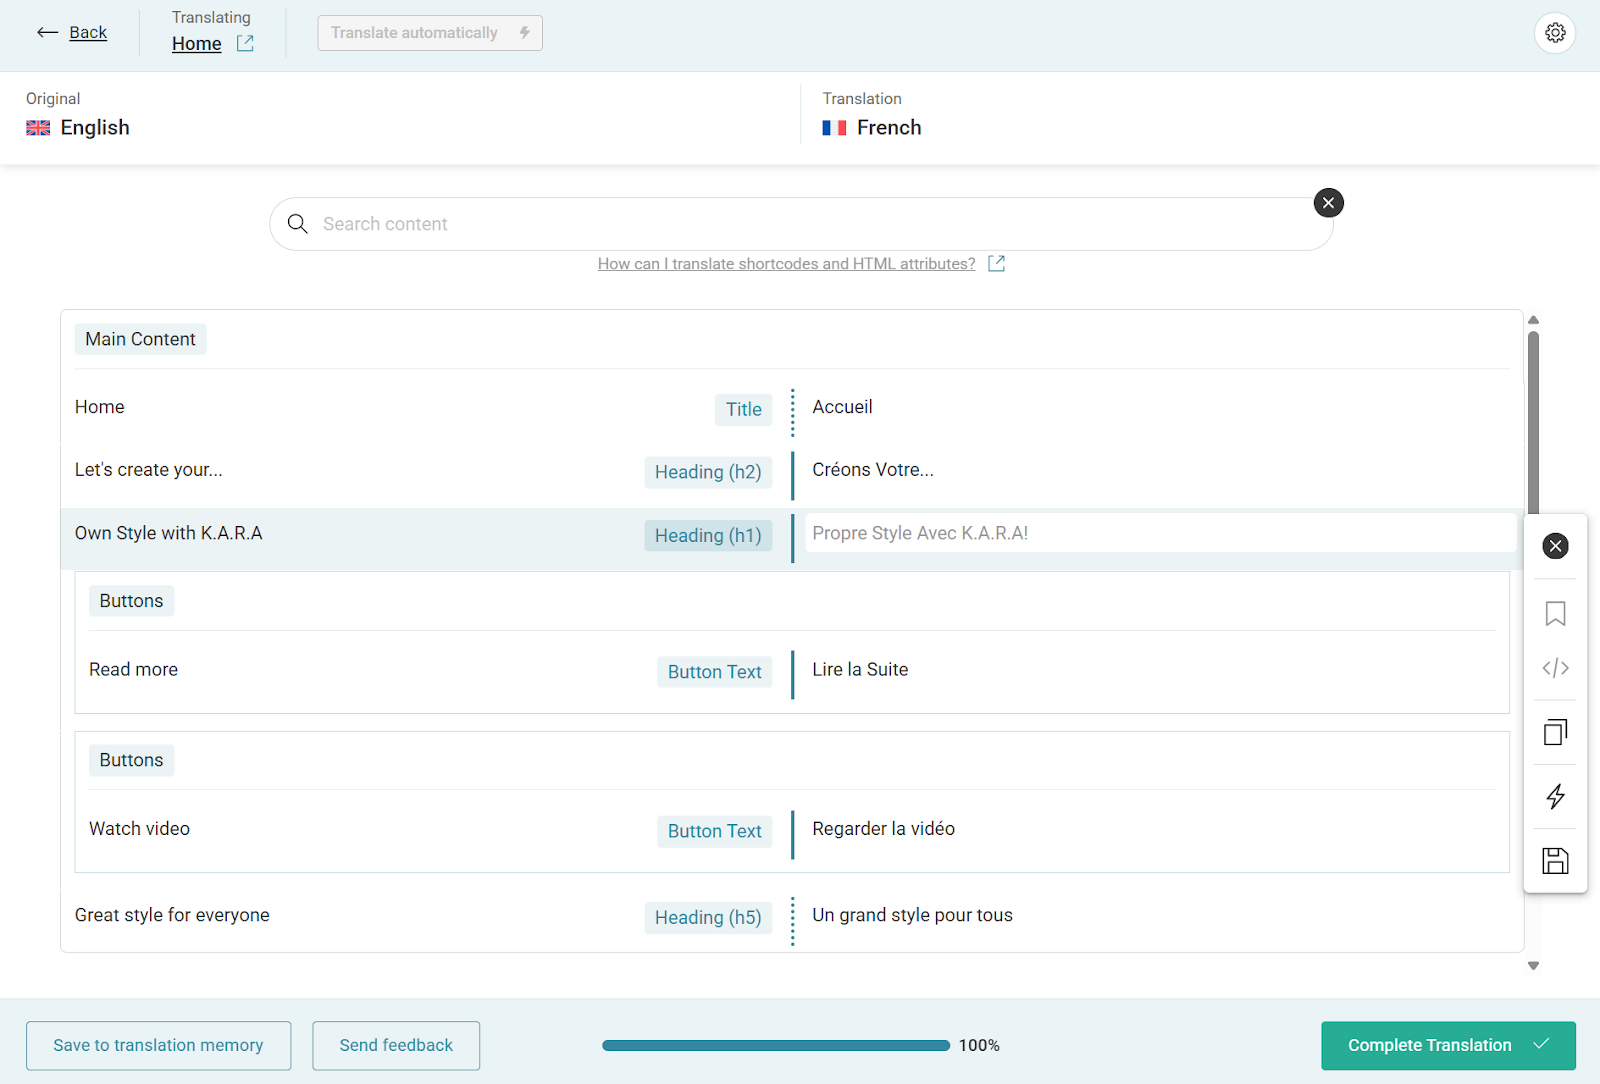
Once you’re done reviewing, click the Complete Translation button to publish translations. Your content will now appear translated when switching languages on your site.
Translating Menus and adding a Language Switcher to the Header
Now that we have translated all pages and posts, it’s time to translate the menus and manage your Language Switcher settings so website visitors can choose the language they want.
Before editing your menus, please check if activating the WPML plugin affected any of your permalinks or your menu locations in any way, and correct this.
Translate Primary (or any other) Menu
Now let’s see how you can set your menus for each of the languages added. The menus can be translated similarly as pages or posts. Here, we’ll show you how to translate your Primary Menu:
Step 1 – Navigate to Appearance > Menus and select your Primary Menu. Your primary menu will be set for your default language. In our case, this will be English.
On the upper right corner of the “Menu Structure” section, you will notice the translation options similar to those you used for translating pages:

Step 2 – To start translating your menu, click on the language translation option. We choose to translate the menu in our example to the French language.
Step 3 – Start by giving your translated menu a name (we used “Primary Menu – French”). You will notice that the language and the original menu you’re translating are already selected. Click on the “Create Menu” button to create the translation.
Step 4 – Once your menu translation is created, you can add menu items. Keep in mind that you will see only translated pages and posts in your item list. Pages and posts that have not been translated into the language of the menu you’re editing will not be available.

Step 5 – Once you add the appropriate language versions of pages, posts, and other items to the translated menu, click on “Save Menu” to save the changes you made.
You can translate your other menus this way too.
Managing the Language Switcher
Our final step here is to manage the Language Switcher and add it to the desired location. WPML provides its own out-of-the-box Language Switcher that can be added to your menus, widgets, and footer.
You can add Language Switcher and manage all its settings at WPML > Languages. Here you will find two groups of settings:
- Global “Language Switcher options” applied to all language switchers on your website,
- Individual settings for each of the language switchers added to your website
In the global “Language Switcher options”, you will find the following settings:
- Order of languages: Set the order in which available languages will be shown in the switcher.
- How to handle languages without translation: Choose if you want to with the content without translation – skip it or link it to the home page in the selected language.
- Preserve URL arguments: If you use any of the plugins that need URL arguments to function properly, add these here to keep them when switching languages.
- Additional CSS: You can use this option to add styling to your Language Switchers using CSS.
Individual settings can be applied to each of the language switchers in different language switcher sections. These sections are:
- Menu language switcher.
- Widget language switcher.
- Footer language switcher.
- Link to translation of posts.
Adding A Language Switcher
As an example of how to edit these settings and add the language switcher, we’ll be adding the Language Switcher to the Primary Menu. Please follow these steps:
Step 1 – Navigate to WPML > Languages and scroll down to the “Menu language switcher” section.
Click the “Add a new language switcher to a menu” button. This will open a popup for adding a new menu language switcher.
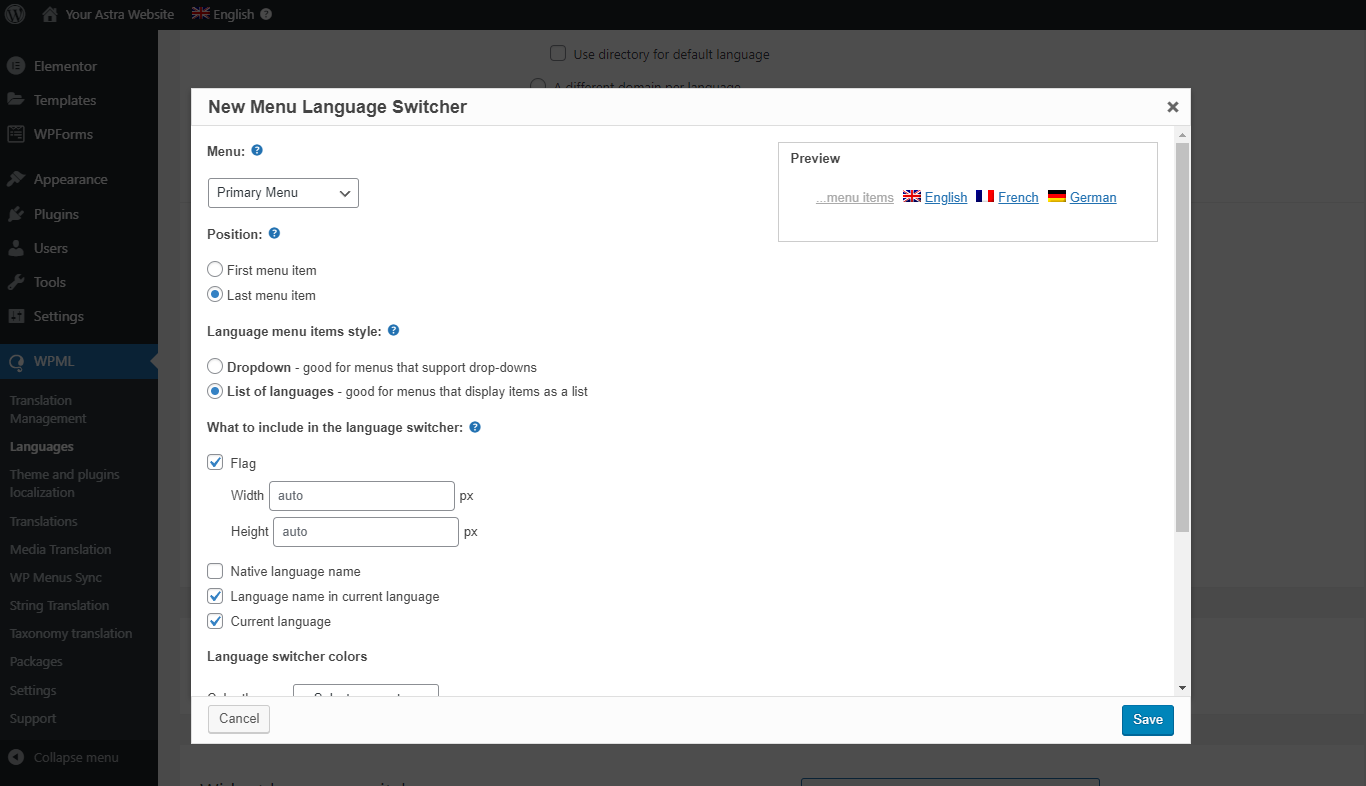
Step 2 – Choose to which of your menus you would like to add this language switcher. We will choose the “Primary Menu” here.
Step 3 – Select if you want to show the languages as a dropdown menu or the list of languages.
Step 4 – Decide how the languages should be represented: by the flag, native language name, or the name in the current language. Also, here you can select if you want to show or hide the “current language” option.
Step 5 – In the end, set the language switcher colors. Click save to add your Language Switcher:
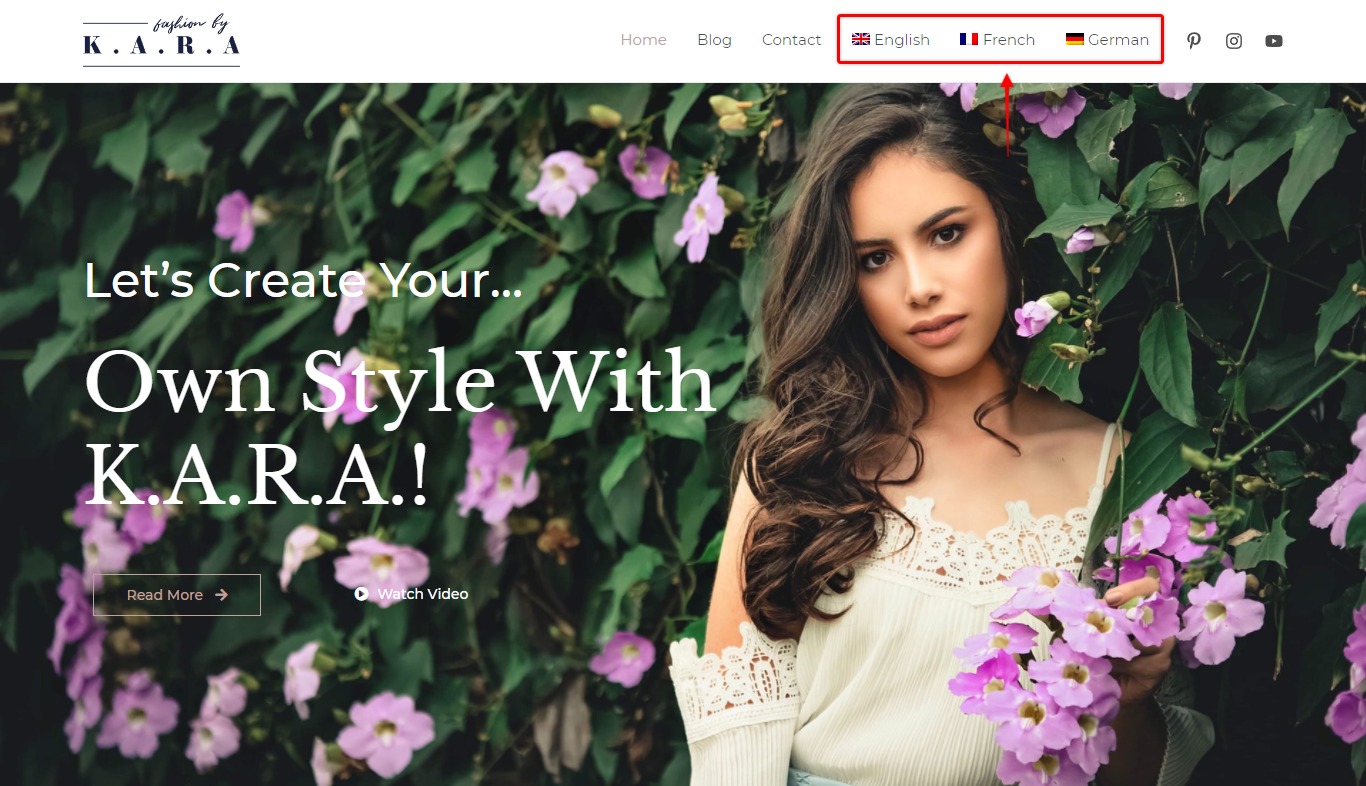
Great job, your multilingual website is ready for visitors.
Other WPML Settings
In addition, at WPML on your WordPress dashboard, you can find a lot of additional settings for your multilingual website.
For more details, or help and assistance working the WPML plugin, you can check the official WPML documentation.
We don't respond to the article feedback, we use it to improve our support content.