- What is Astra Pro Add on?
- What Is a Child Theme and How To Install It for Astra?
- How to Activate Astra Pro Addon License?
- How to Get License Key of Astra Pro?
- How to Install Astra Pro Plugin?
- Getting Started with Astra Pro Addon Plugin
- Getting error – The package could not be installed. The theme is missing the style.css stylesheet?
- Do Not See License Activation Form for Astra Pro Addon Plugin?
- How to Install Astra Theme?
- Why Is My Logo Blurry?
- FAQs – Astra Header/Footer Builder
- Elements in Header/Footer Builder With Astra Theme and Astra Pro
- Add Multiple Elements in Header Footer Builder
- How To Create a Header With Astra Header Builder?
- How To Create a Footer With Astra Footer Builder?
- How To Create Mobile Header With Astra Header Builder?
- FAQs – Astra Header/Footer Builder – Existing Customers
- Clone and Delete Elements in Header Footer Builder
- Blog Overview
- Blog / Archive
- Single Post
- How to Display “Last Updated” instead of “Published” Date
- Display Related Posts on Single Blog Post
- The Recommended Size for Featured Image
- How to remove an Author’s name from a Single Blog Post?
- How to Remove Astra Post Excerpt from the Post Archive
- Add Last Updated or Published Date to Blog Posts
- WooCommerce Integration Overview in Free Astra Theme
- How to Add WooCommerce Mini Cart in Header? (Old Astra Header)
- Set WooCommerce Shop Page as Homepage
- WooCommerce hooks
- Display Featured Products instead of Empty Cart
- How to Set the “Review” Tab as the Default Active Tab in WooCommerce
- How to Add Additional Content on the My Account Login Page
- How to Change the Background Color of Product & Shop Pages in Astra?
- Astra – Customize the Submenu
- The Blank Screen in the Customizer Area
- How to use the color palette of the Astra theme
- How to Import / Export Astra Customizer Settings
- How To Disable Logo Cropping
- How to Create a Sticky Sidebar for Your WooCommerce Shop Page
- How to use dynamic customizer from Astra 4.0.0
- How to Change the Typography of the Astra Menu
- Simplify Your Site Design with the New Style Guide
- Astra WooCommerce Mini Cart Shortcode
- WooCommerce Module Overview
- How to Design a Product Catalog Page or Shop Page Using WooCommerce Module in Astra?
- Single Product WooCommerce
- Checkout Page WooCommerce
- Colors & Background Options For WooCommerce
- Typography Options for WooCommerce
- How to Add WooCommerce Mini Cart in Header? (Old Astra Header)
- Off-Canvas Sidebar for WooCommerce Shop Page
- Quick View for WooCommerce Products
- Structuring Shop WooCommerce Page
- How to Remove Border Around the Cart? (Issue After Updating to Astra 3.4)
- What To Do When Product Count Is Not Visible on Mini Cart With Astra Pro?
- How ‘Enable Filter Accordion’ Works
- Add a Wishlist button to Your WooCommerce Website
- How to disable cart fragments on WooCommerce?
- Misc – WooCommerce
- Change Color of Sale Badge – WooCommerce
- How to Enable WooCommerce Product Quantity Icons
- How to Manage WooCommerce Product Image Width
- Introducing New Add to Cart Trigger Actions for Shop and Single Product Pages.
- How Astra Pro Supports WooCommerce’s HPOS Upgrade
- How to Disable EDD Inbuilt Styling?
- How to Add Download Archive Pages to the Menu When Using Astra with EDD?
- How to Add EDD Cart in Header? (Old Astra Header)
- How to Display a Mini Cart Anywhere Using Shortcode? (Astra and EDD)
- EDD – Easy Digital Downloads Module Overview
- General – EDD Module Options
- Product Archive – EDD Module Options
- Single Product – EDD Module Options
- Checkout Page – EDD Module Options
- How to Translate Astra Theme / Plugins in Your Own Language using GlotPress?
- How to Turn Astra Multilingual with WPML?
- How To Translate Site Builder With WPML?
- How to Translate Astra Strings with WPML?
- How Translations can be Manually Exported and Uploaded to the Site?
- How to Turn Astra Website Multilingual with Polylang?
- How to Translate Categories, Tags, and Astra Strings with Polylang
- How to Turn Astra Website Multilingual with TranslatePress?
- How to translate the WooCommerce string?
- Footer Custom Text Helper Strings
- Does Astra support Beaver Themer Plugin?
- Increasing the PHP Memory Limit of Your Website
- How to Disable Header or Footer for a Landing Page or Post?
- Where Does Astra Primary Color Setting Take Effect?
- How to Adjust the Width of Your Sidebar?
- How to Update the Plugin Manually from WordPress Backend?
- Recommended Settings for Elementor and the Astra Theme
- Recommended Settings for Beaver Builder and the Astra Theme
- Astra Pro WP CLI Commands
- How to Increase PHP Time Limit for a Wordpress Site?
- Font Selection
- How to Bulk Edit Astra Meta Settings on Multiple Pages & Posts at Once?
- How to Disable Comments On A WordPress Site
- How to Build Advanced Websites Based on Custom Post Types with Toolset and Astra?
- What is a Favicon or Site Icon?
- How to use RGBA color picker?
- Backup Your Website in Less than 10 Minutes!
- Astra Options Page – All Settings Explained
- How to Remove Previous and Next Links From a Single Blog Post?
- How to Set Background Image for the Site?
- How to Display WooCommerce Sidebar on Top for Mobile Devices?
- How to Edit style.css in Child Theme?
- How to Activate License Key on Wordpress Multisite?
- How to add Google Analytics Code with the Astra Theme?
- How to Merge Above/Below Header Menu with a Primary Menu in Responsive?
- How to Refresh / Flush WordPress Permalinks?
- Not Receiving Update Notification for Astra Theme?
- Default Structured Data and Schema Markup in Astra Theme
- About Icons Font That Comes with Astra
- Sidebar / Container Options in Customizer for Learndash Not Working?
- How to Add Social Media Icons to Header?
- Know More about Astra Beta Versions? How to Download and Use?
- How to Add WooCommerce Mini Cart in Header? (Old Astra Header)
- Stick Footer to the Bottom When Page Content is Less
- How to Add Google Tag Manager Code to Astra?
- How to Download Older Version of Astra Theme or Astra Pro Addon plugin?
- LearnDash Shortcode to Add Profile Link
- LifterLMS Shortcode to Add Profile Link
- Search Shortcode to Add Search Box in Astra
- Color for Anchor Tag Inside Heading Tag
- How to Add Font Awesome Icons in Astra?
- Automatic Beta Updates for Astra
- Adding Custom Sidebar to the Theme with Lightweight Sidebar Manager plugin
- Google Fonts Not Loading with Astra
- How to Switch to Astra from Another Theme?
- How to Set up a WordPress Staging Site?
- How to Duplicate Custom Layouts and Page Headers?
- Display Submenu Just Below the Header
- How to Set Animation To The Sub Menu?
- How to Create Different Headers on Different Pages Using Astra?
- How to Add Custom Fonts in Astra?
- How to Disable EDD Inbuilt Styling?
- How to Add Download Archive Pages to the Menu When Using Astra with EDD?
- How to Add EDD Cart in Header? (Old Astra Header)
- How to Display a Mini Cart Anywhere Using Shortcode? (Astra and EDD)
- How to Disable the White Label Settings Permanently?
- Native AMP Support in Astra
- Display Products from Same Category with Navigation
- How to Change the Direction for Submenu Opening?
- Configure AMP Plugin
- Astra Options that won’t work with AMP
- How To Add RTL CSS via Child Theme?
- Browser Support by Astra
- Naming Convention for Astra 2.1.0 CSS File(s)
- How to Get Started with CSS File Generation
- Get SkillJet Access – Brainstorm Force Customer
- How to Remove Featured Image Link on Archive Page?
- Astra 2.2 for Existing Users
- How to Enable Astra Comment Box on Custom Post Types?
- How to Setup Custom Adobe Fonts (Typekit) Plugin?
- Usage Tracking
- New Color Controls in Astra theme & Astra Pro Addon
- How to Add Gutenberg Design Compatibility?
- Revamped Astra’s Customizer
- How to Remove the White Bars in the Safari Browser on iPhone X and Higher
- FAQs – Astra Pro 3.2 – Site Builder Inside Pages/Posts
- Optimize Astra HTML and CSS – For Existing Astra Users (Before v3.3)
- Astra’s Default Font Icons Replaced With SVG
- Modify Your PHP Configuration
- Responsive Editing With the Astra Theme
- Why Doesn’t Parallax Scrolling Work on Mobile?
- The Recommended Size for Featured Image
- How To Override Astra’s theme.json in Child Theme?
- Manage Astra Pro With Composer
- Improved Block Editor Experience with Astra
- Mixed Content
- Using Advanced Custom Fields with Astra
- Add a Wishlist button to Your WooCommerce Website
- How to create a correct format svg logo?
- How To Fix Not Being Able To Edit Submenu Colors, Above and Below Header?
- How To add Custom CSS for Specific Pages
- Fix Mobile Usability Issues on Astra
- How to Add Images or Icons in the Navigation Menu
- How to Create a Button with a Link
- Does Astra Offer a Dark Mode Feature?
- How Do License Upgrades Work?
- How to Renew Yearly License?
- How to Apply For Brainstorm Force Affiliate Program? (Become Astra Affiliate)
- How to Manage License on Store?
- How To Update Your Payment Method?
- How do I check my Support Ticket History?
- Frequently Asked Questions – VIP Priority Support
- How to Process Refund Requests?
- How to Change the Default Astra Strings
- Using Hooks in Astra
- How to Change the “Scroll To Top” Icon in Astra?
- Astra Pro WP CLI Commands
- How to Add Custom PHP Code?
- How to Disable the Loading of Astra’s Default Font File? (Astra.woff)
- Disable Featured Image on Posts, Pages, or Other Post Types
- Change Sidebar Widget Title Heading Tag
- Disable Astra’s Native AMP Functionality
- How to Change Website Logo Destination URL
- Remove Primary Navigation Menu with Hook
- Change the Astra Header Breakpoint Width
- How to Disable Primary Header?
- Add Title attribute to Header Background Image as a Substitute for Alt Text
- How to Change HTML tag for Site Title and Tagline?
- How to Change the Heading Tag for the Page/Post Titles?
- How to Change the “Search Results For” String
- Change Placeholder for Search Box (Old Astra Header)
- How to Display “Last Updated” instead of “Published” Date
- How to Change Previous and Next Link Text from a Single Blog Post?
- How to Remove Featured Image Link on Archive Page?
- Filter to Remove Link From Featured Images on Blog Page
- Blog Featured Image Size Not Working / Error in Image Processing Library
- Filters to Support CPTs for Blog Meta and Single Blog Meta
- How To Change Navigation Links Text for a Blog Archive?
- How to Display the Post Category as a Related Posts Title?
- Change “Leave A Comment” title tag
- Change Woocommerce Out of Stock Text
- How to Disable Product Quantity (Plus-Minus) Buttons?
- How to Modify/Change the Quick View text?
- Filter to Add Global Button Settings Support for WooCommerce Buttons
- Change the “Shopping Cart” Text for WooCommerce & EDD Mobile Header Cart
- Fix Woocommerce Cart Becoming Transparent With Header Builder
- Restrict Search Results to WooCommerce Products Only
- How To Hide Quantity Number When the Woocommerce Cart Is Empty?
- Remove Astra Customization for WooCommerce
- How to Add Custom CSS Code Without Editing Theme Files?
- How to Highlight a Certain Menu Item?
- How to Design Bullets & Lists?
- Dim Content on Menu Hover
- How to add custom CSS and JavaScript to Astra theme
- Mobile Breakpoint Causes Issues with Transparent Header Menu Color
- Display Coupon Field on Checkout & Cart Pages
- Fix Swap Sections Not Working on Mobile (Old Astra Header)
- How to Remove Google Fonts Suggestions in Astra Theme?
- Remove default stretched block layout spacing
- How to Change the Logo on Specific Pages?
- How to remove horizontal & vertical gallery layouts from a single product page?
- Introducing New Filter to Enable/Disable Rank-Math Theme Support
- Enable/Disable YouTube videos from Astra admin dashboard
- How to Fix the Line Height Unit being converted to “EM”?
- How to Change WordPress Post labels to Projects
- Fix for – The PCLZIP_ERR_BAD_FORMAT (-10) Error
- Fix for – Parse error: syntax error, unexpected T_FUNCTION
- How to fix Fatal Error / White Screen of Death?
- Fix for- cURL error 51: SSL: no alternative certificate subject name matches target host name ‘websitedemos.net’
- Getting error – The package could not be installed. The theme is missing the style.css stylesheet?
- ‘The preview could not be loaded’ Pop Up with Astra and Elementor
- Troubleshooting Steps ( with Health Check & Troubleshooting plugin )
- How to Deal with Update Issues in Astra Theme and Astra Pro Addon?
- Blog Featured Image Size Not Working / Error in Image Processing Library
Add a Wishlist button to Your WooCommerce Website
Adding a wishlist button not only boosts up sales but it also lets you know about the products that are wanted by the customers and might be overpriced. In this document, we will explain how to add a wishlist button to your website using a plugin called wishlist.
How to Add a Wishlist button to Your WooCommerce Website
Adding a wishlist button to your website is a quick and easy process. You can follow these simple steps to get started:
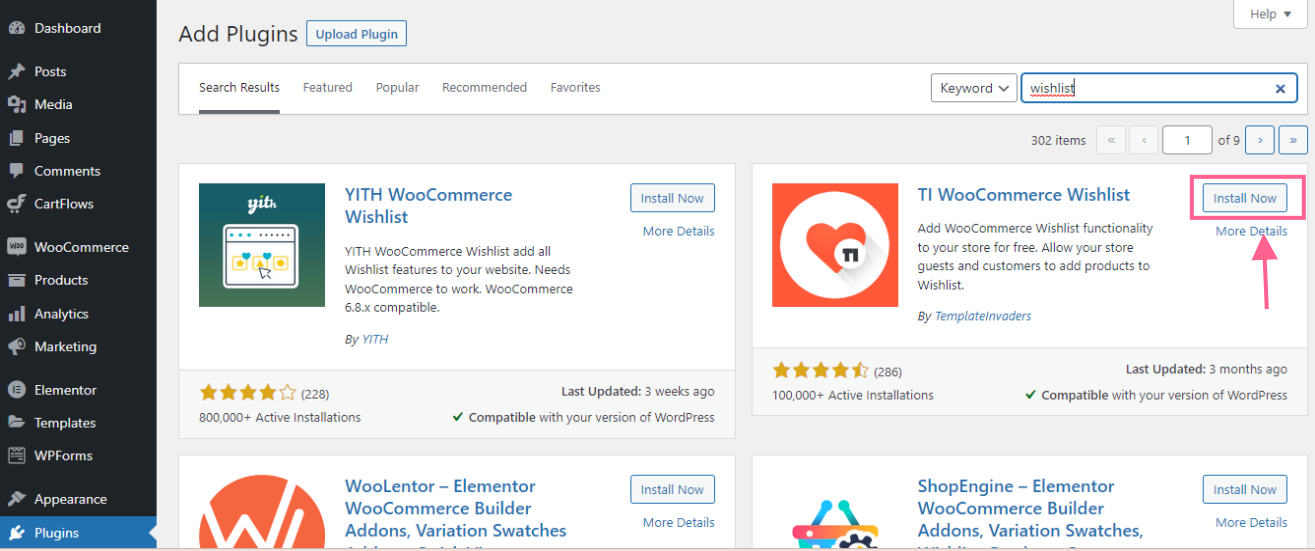
Step 1: Installation and Activation
Navigate to your WordPress dashboard and click on plugins. Click on add new and search for Wishlist. You will find the plugin named “Tl WooCommerce Wishlist”. Click on Install button next to the plugin to install it and click on activate once the plugin is installed.
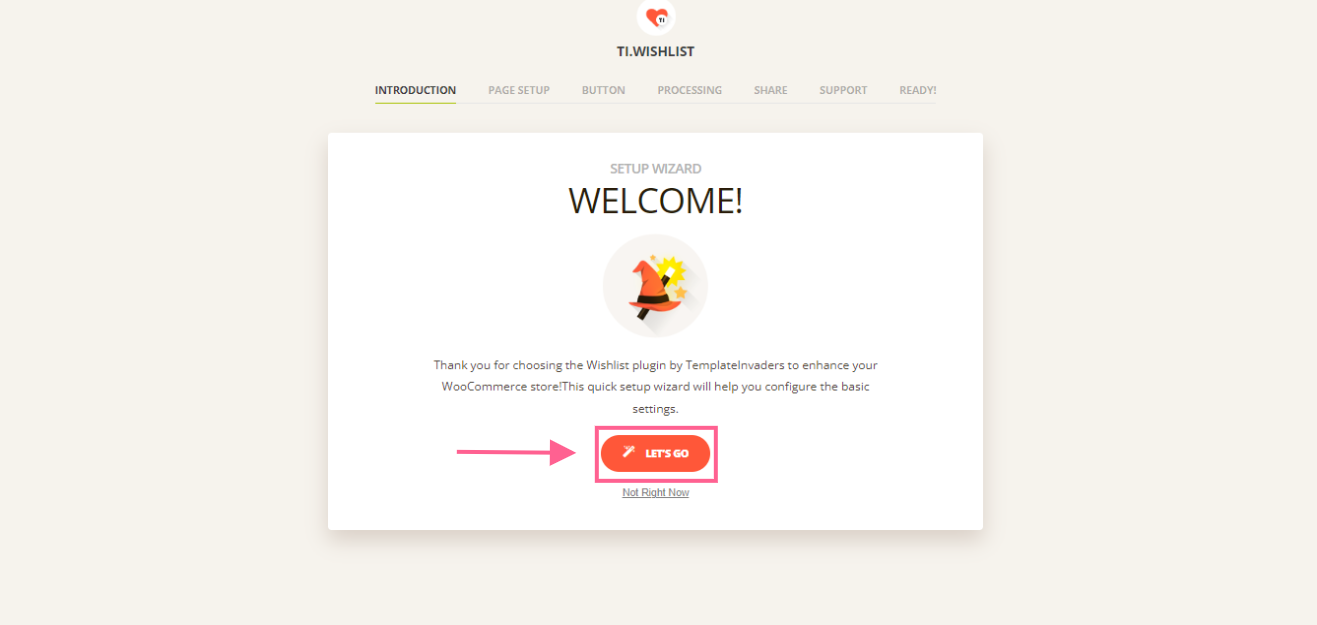
Step 2: Introduction page
Once you activate the plugin, you will automatically be redirected to the introduction page. Click on the “Let’s Go” button to continue the setup.
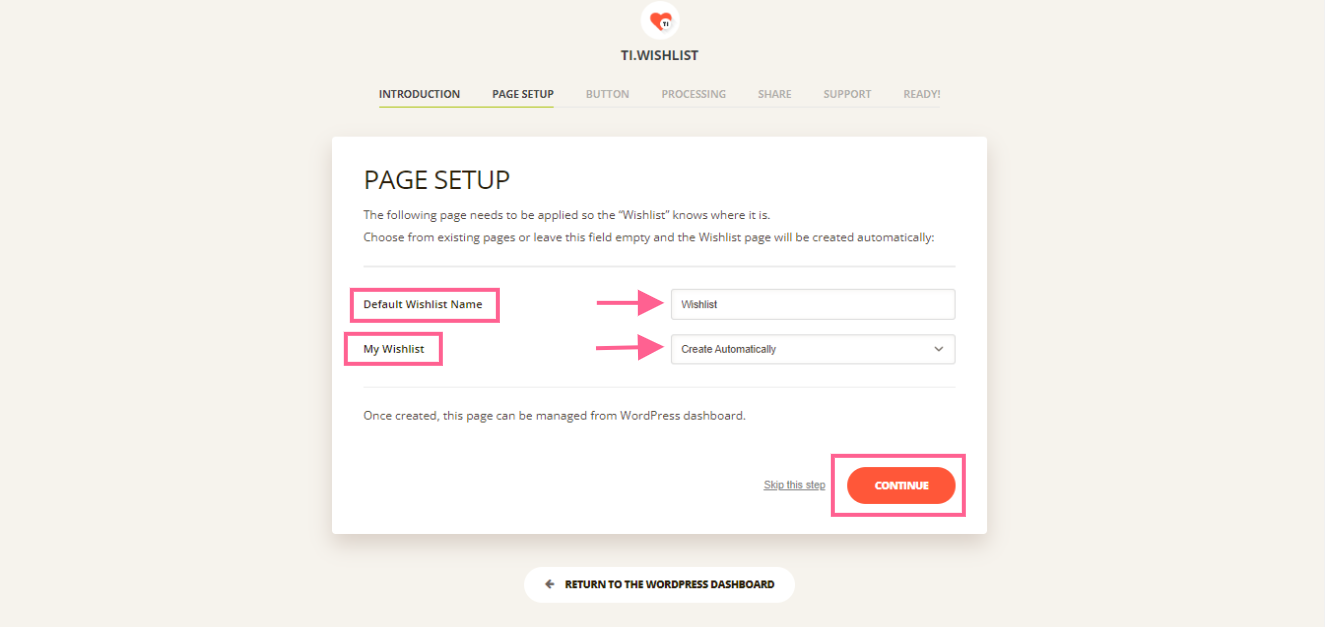
Step 3: Page SetUp
In this step, the plugin will ask you to select a page where you want to display the wishlist. If you do not have a page created already, you can select it as “Create automatically”.
It will also ask you to select a name for the Wishlist. You can choose the name of the wishlist as per your requirement. Once you are done with the settings, click on continue to got the next page.
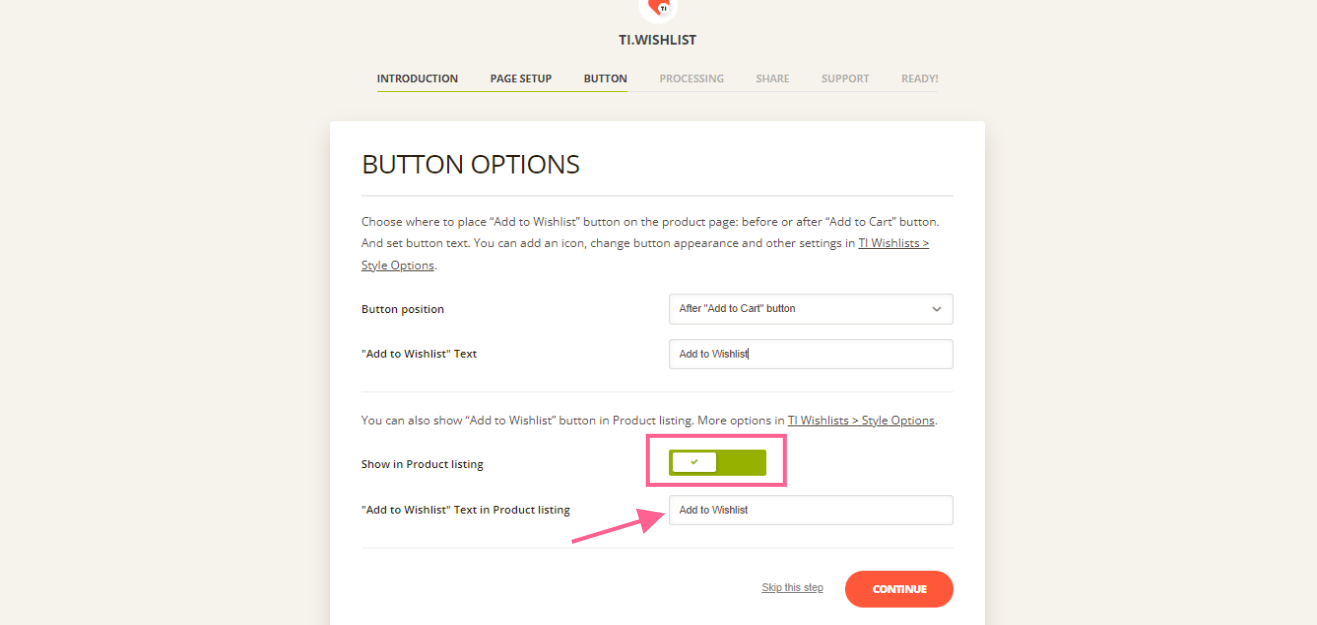
Step 4: Set up the Button
In this step, you will need to set up the wishlist button. The following are the set of settings that you can choose from.
Button Position: This particular setting lets you choose where the “Add To Wishlist” button appears. By default, you can select whether you would like the button to appear after or before the “Add to Cart” button. You can also use custom codes to change the position of the Wishlist button.
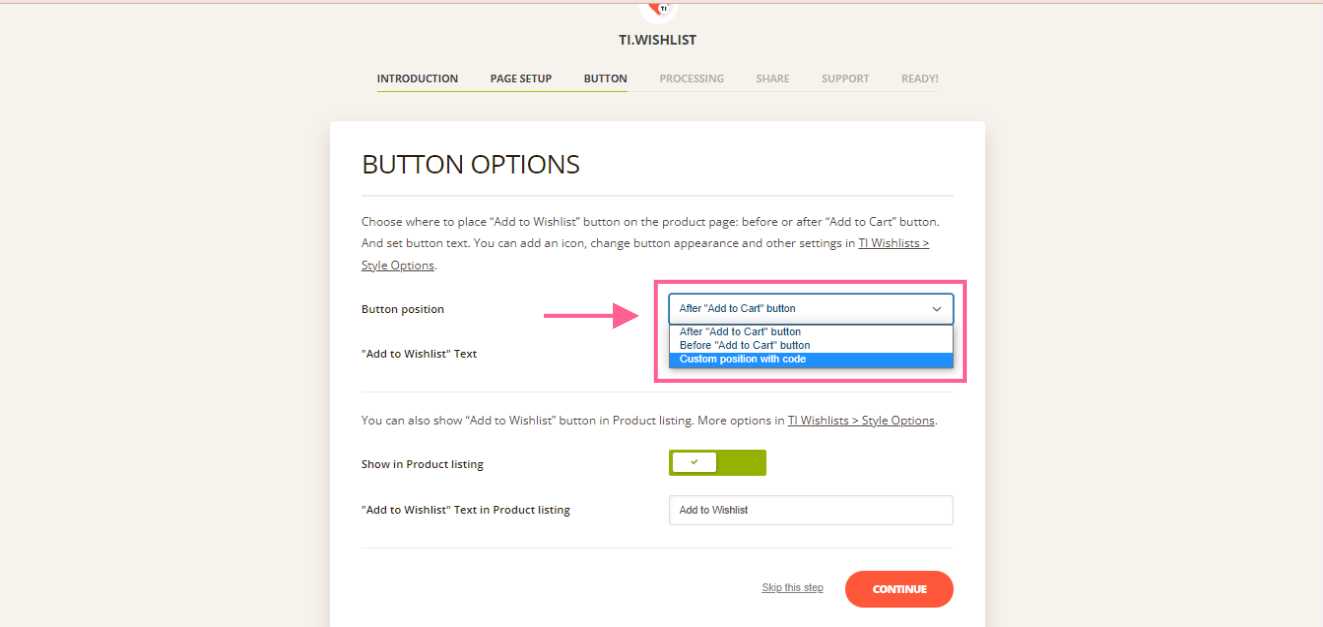
Add to WishList text: This option lets you change the default text of the Add to Wishlist to any custom text as per your requirement.

Product Listing : You can also show the “Add to Wishlist” button in Product listing and change the text of the “Add to Wishlist” button in the product listing as well.
Step 5: Processing
Once the customer has purchased the product which was added in the Wishlist, it should be automatically removed from the Wishlist. The processing step lets you choose the option of how you would like it to be removed from the customer’s wishlist.
You can either choose automatically and the plugin will remove it for the users or you can select manual and the product will be added to the wishlist until the user removes it manually.

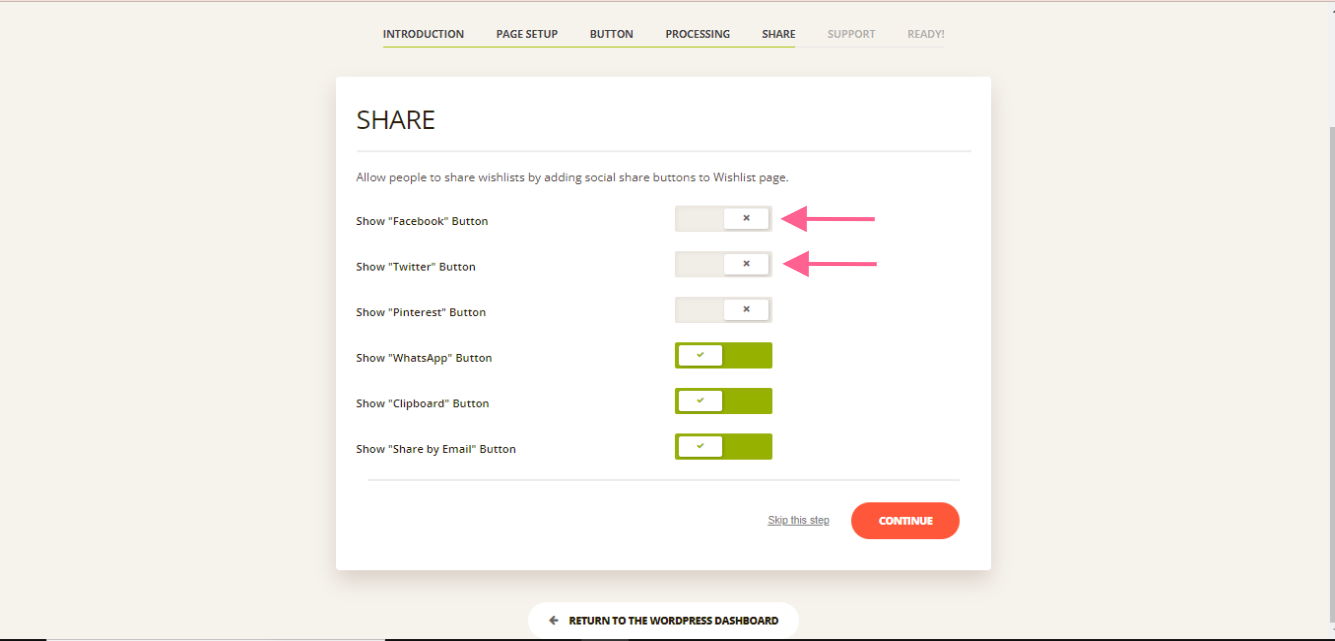
Step 6: Social Share
This option lets your customers share the wishlist on various social media platforms such as Facebook, Twitter , whatsapp etc. You can simply turn the buttons off, if in case you would like to remove any of these options.
That’s it, the basic settings are done. Here is how this is going to be displayed on your product listing page and also on the individual product pages.
We hope this document has been helpful! If you have any questions or require further assistance, feel free to leave a comment below.
We don't respond to the article feedback, we use it to improve our support content.